Connecting GitHub with Jenkins - Step by step Tutorial

Hello Everyone,
In this tutorial, we will learn how to create a New Item (Project), connect Git and GitHub to Jenkins and run the files from the Git repository on Jenkins.

Jenkins is an open-source automation tool written in Java with plugins built for Continuous Integration purposes. Jenkins is used to build and test your software projects continuously making it easier for developers to integrate changes to the project, and making it easier for users to obtain a fresh build.


Facing trouble with the installation of Jenkins? Click here to know more.

NOTE: It is mandatory to install plugins for Git and GitHub before connecting your GitHub repository to Jenkins. If you're using Jenkins for the first time, you need to install the plugins. To know more about these plugins, check out Git and GitHub Plugins for Jenkins.


This tutorial demonstrates executing python code which requires separate plugins. Know more about Python Plugins.


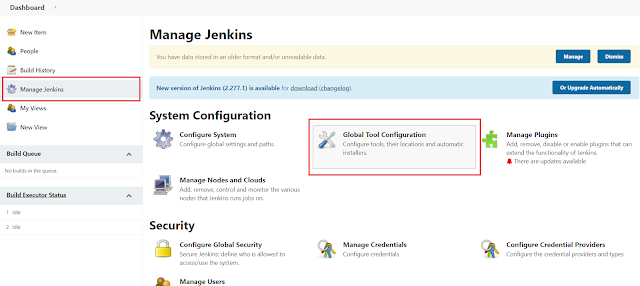
Step 1) From the Jenkins Dashboard, go to Manage Jenkins. Then select Global Tool configuration.


Step 2) Now in the Git section, enter the path where the Git Executable file is located. The name is optional. Then click on Save.


Step 3) From the Jenkins Dashboard, select New Item.


Step 4) Enter the Item name (Name of the project) and then select Freestyle project.


Step 5) Enter the Project Description.


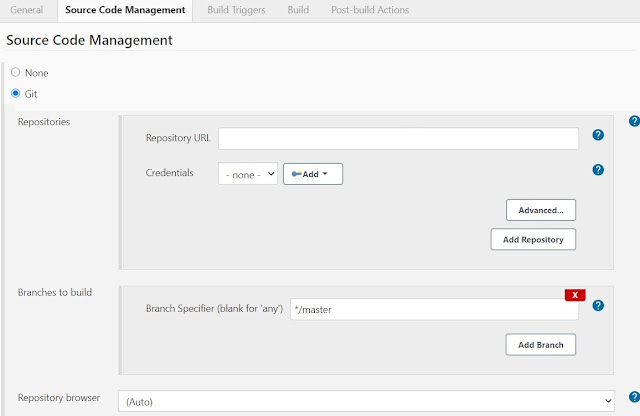
Step 6) Select Git in the Source Code Management, as the project files are located in the Git Repository.


Step 7) A dialog box will appear.

In the Repositories Section, enter the Repository URL.

To get the Repository URL- Go to GitHub, in the code section, in the clone sub-section, copy the URL available in the HTTPS tab. Now paste this URL here.


If your repository is private then you need to enter your account credentials.

Now in the Branches to build Section, enter the Branch Specifier. Check on the GitHub whether the branch specifier is master or main or some other branch.

Step 8) Then go to the Build Section and click on Add Build Step and select Custom Python Builder.

NOTE: If the plugins for python are not installed, you will not get the option of Custom Python Builder. To know more about Python Plugins, kindly check out Python Plugins for Jenkins.

Step 9) Now in the HOME field, enter the path of the Python Compiler. In the Nature, enter SHELL and in the Command field, enter the python file name.(As the python file is located in the Git repository, there is no need to enter the path of file). Now Save the project.


Step 10) Now click on Build Now. If the project is built successfully, the indicator will turn blue. If any errors are encountered then it will turn red. Select the build created in build history. To see the output, click on Console Output.


Check out other posts related to Jenkins

Comments

Popular posts from this blog

How to Download and Install Jenkins on Windows Operating System.

Hello Everyone, This is a tutorial about how to download and install Jenkins on Windows Operating System. Jenkins is an open-source automation tool written in Java with plugins built for Continuous Integration purposes. Jenkins is used to build and test your software projects continuously making it easier for developers to integrate changes to the project, and making it easier for users to obtain a fresh build. PREREQUISITE- Java Development Kit (JDK) and Java Runtime Environment (JRE). Currently 1.8 and 1.11 versions are supported by Jenkins. If other versions are installed, kindly reinstall 1.8 or 1.11. DOWNLOADING JENKINS- Step 1) Go to the website https://www.jenkins.io/ and click on the download option. Step 2) In the Downloading Jenkins section, select the LTS (Long Term Support) version for Windows. It is a more stable version with new updates every 2 or 3 months. Step 3) The Jenkins windows installer will be dow

IoE (Internet of Everything) Question Paper Solution (MCQs) for 2020 Mumbai University Examination Information Technology Semester 8

Hello Everyone! This article is based on the Multiple Choice Questions asked in the University Exam for the subject Internet of Everything. These MCQs were asked in the 2020 Mumbai University-BE-Information Technology-Semester 8 Exam for the subject- Internet of Everything. The question paper for each cluster is different. These MCQs were asked in the examination of one cluster. The question paper had 25 MCQs of 2 marks each. Q 1) ________ involves making smaller and smaller things with the ability to connect and interact. a. Smart Tech b. Micro Tech c. RFID Tech d. Nano Tech Solution: d) Nano Tech Q 2) RFID stands for? a. Radio frequency identification b. Random frequency identification c. Random frequen

How to add Python Plugins in Jenkins

Hello Everyone, This tutorial is based on the different plugins required to execute python programs on Jenkins. Jenkins is an open-source automation tool written in Java with plugins built for Continuous Integration purposes. Jenkins is used to build and test your software projects continuously making it easier for developers to integrate changes to the project, and making it easier for users to obtain a fresh build. To execute any Python Code on Jenkins, there are two essential plugins which must be installed. The two plugins are - Shining Panda plugin and Python plugin. Following are the steps to install the plugins on Jenkins. (These steps are common for the installation of all the plugins). Step 1) Select Manage Jenkins option from the dashboard. Step 2) In Manage Jenkins, select Manage Plugins. Step 3) Now click on the Available tab. In the search bar, enter Python. (If the plugins are already installe